Mastering Seamless Tube Quality: How Laser-Ultrasonics Reshapes Non-Contact Hot Tube Measurement
Introduction
In an ever-evolving economy, tube and pipe manufacturers are facing unprecedented pressure from increasing client expectation, fierce competition, and intricate, unstable supply chains and rapidly rising inflation. Internal pressure is also considerable as companies constantly look for ways to reduce costs, improve quality control and increase productivity.
Early insight changes everything
To counter this unpredictability, manufacturers must accurately control product characteristics and quality from the first production stages.
Consider, for instance, the importance of the earlier detection of uneven heating in billets, unavoidable tool wear or of drifts in roll-stand settings. Each mill variable has an impact on the characteristics of the finished product. In the harsh environment of these mills, unpredictability lurks at every step of the production line. Knowing about the performance at each stage of the process is crucial to controlling output quality and loss reduction. The challenge is to do so online and in real time when the tubes and pipes are hot and being formed.
The good news is that there are hot production line optimization tools to help achieve these goals.
Gamma ray gauges have long been a mainstay in the tube industry, but their prevalence is marked by unremitting constraints. Gamma ray emitting sources, such as the radioactive isotope Cs-137, are subject to increasingly stringent regulations for their acquisition and replacement, making this technology even more difficult to manage. What’s more, geopolitical factors constantly threaten supply to and embargoes, currently the case in some countries. As the industry grapples with these limitations, a proven, viable technology is earning widespread attention: laser-ultrasonics.
Tecnar’s Lut 2.0 is at the forefront of this technological transition. This non-contact gauge is designed to measure the key online characteristics of hot tubes and pipes during manufacturing, such as wall thickness (WT), eccentricity, temperature, and length. The Lut 2.0 may be used from billet piercing outlet to sizing mill outlet. By monitoring key tube characteristics and using its innovative algorithms, the system automatically tracks slow drifts in production and their cause before they deviate from finished product specifications. All of this means that operators receive early insights so they can pre-emptively fine-tune parameters and implement corrective measures on time, optimizing production and quality.

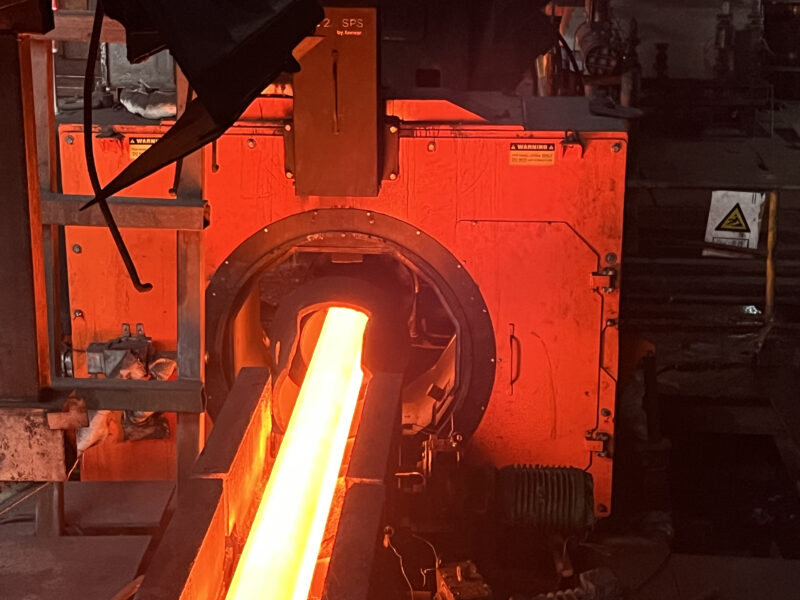
Tecnar Lut 2.0 SPS at Baotou, China
How the Lut 2.0 achieves this:
Operating in tandem with the plant network, the Lut 2.0 requires a minimal set of inputs: the tube’s nominal WT, nominal outer diameter, and alloy type. With this information, the gauge automatically sets the precise position of the measuring probe, plus the proper speed-of-sound chart from the integrated database tailored to the alloy and measured temperature. From there, the intelligent algorithm is set up to process and interpret the recorded laser-ultrasonic waveform, uncovering any WT or eccentricity anomalies. As the Lut 2.0 deciphers each tube’s story and tracks drifts in long production runs, it synergizes human experience and machine precision.
Real-time data:
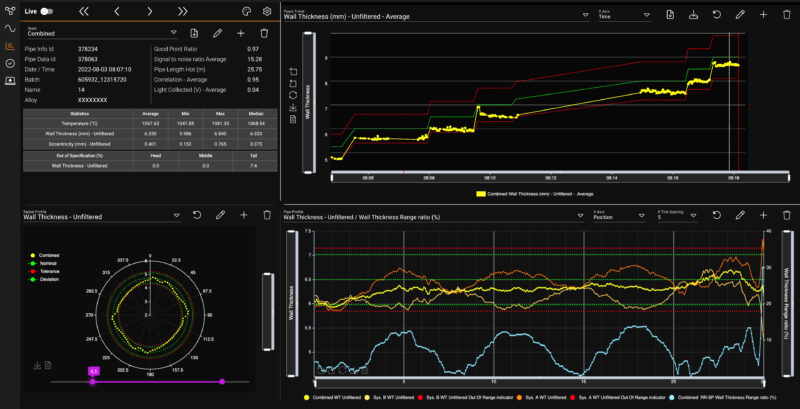
Real-time information is crucial for monitoring dynamic processes. Lut 2.0 collects highly accurate real-time data essential for tracking batch trends and progressing potential WT and eccentricity deviations. These may be caused by uneven heating of the billet, by inaccurate roll-stand settings or by tool wear. Using the detailed automated analysis of a tube sequence’s WT profile, the Lut 2.0 identifies and tracks the source of deviation. Operators then receive the results in a comprehensive and intuitive user interface.
User-friendly interface (UI):
Organized in an intuitive architecture, the information is presented in the form of tables or graphs by a user-centric interface (UI) based on a powerful software platform. The UI displays information such as pipe identification and characteristics, illustrations of pipe radial and longitudinal profiles and batch history in Windows or in the same screen, as the user prefers. Easy-to-interpret visuals deliver valuable information at a glance. Its intuitive design minimizes the learning curve so that users can easily use the software’s various powerful features. In addition, an easy-to-navigate dashboard allows plant operators and managers to quickly access the information, providing them with a gateway to agile decision-making.

Historical data, batch trend and deviation tracking:
Lut 2.0 stores historical data from all the tubes measured, enabling users to compare current results with past records. With just a couple of clicks, operators and managers can view the history display to monitor batch fluctuations and deviations over time. This feature allows them to observe developing patterns, identify anomalies and make informed decisions based on accurate historical data. It’s particularly useful to identify the cause of the observed drift before it falls out of tolerance.
Wall thickness monitoring:
Wall thickness (WT) is one of the key parameters in seamless tube making. Radial and longitudinal profiles are displayed to quickly provide information on heating or piercing eccentricity, tool wear and mandrel fatigue or heavy ends lengths. This ensures that deviations or inconsistencies are promptly identified so that operators can take corrective action to maintain product quality and minimize waste.
Roll-stand settings:
Roll-stand settings play a vital role in seamless tube manufacturing. Using the Lut 2.0 high-resolution radial WT profile display, operators can discern minute details originating from setting discrepancies between even and odd roll-stands. This provides a proactive approach to reducing waste and increasing quality consistency.
User roles and access:
Different users have different needs. The Lut 2.0 offers each user type role-based access and custom displays. It ensures that everyone has access to data and functionalities presented in a way that’s relevant to their particular tasks and responsibilities. Managers can focus on the production performance while operators can concentrate on individual tube profiles. Such functionalities foster optimal engagement and utilization.

Conclusion
The noncontact laser-ultrasonics technology (Lut) emerges as a reliable option when the time comes to replace aging gamma-ray-based gauges or to add new ones to a seamless tube production line. For more than a decade, gauges such as Tecnar’s Lut 2.0 have been successfully measuring the key online characteristics of hot tubes and pipes to reshape the landscape of hot seamless tube production. Their intuitive user interface (UI) is a powerful platform that empowers plant operators and managers to make informed decisions based on accurate data to optimize their hot seamless tube production processes.
By presenting user-friendly and visually engaging real-time data, these gauges provide plant operators and managers with detailed information on each individual tube, as well as an advanced toolset to track batch trends. Such tools have been shown to help them promptly address issues such as wall thickness deviation and eccentricity stemming from uneven heating, piercing, mandrel fatigue or roll setting inaccuracies. The Lut 2.0 gauge can really enhance process control and overall operational efficiency by helping to elevate quality consistency, lower costs and improve productivity. In essence, these gauges are more than just tools: they’re key assets for manufacturing excellence and increased profitability.
(This article was originally published in ITATUBE Journal – December 2023)
