Knowledge is Power
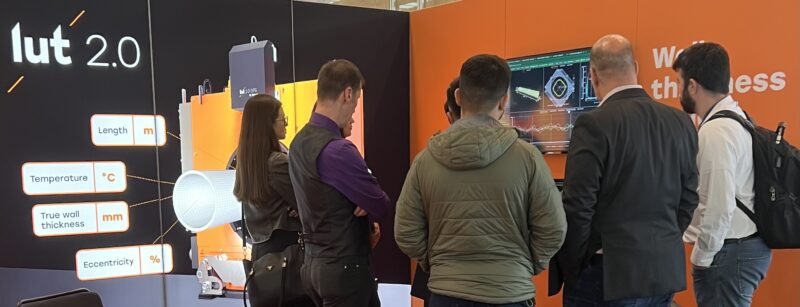
Saint-Bruno-de-Montarville, Québec, June 2024 — To keep the hot rolling process in check while making steel tubes, operators must make crucial decisions at every moment. To make the right decisions time after time, they must have quick, easy access to reliable, up-to-date information. Enter the Tecnar Lut 2.0. It provides the real-time information operators need to optimize the process and tube quality. It uses laser ultrasonic technology to measure true wall thickness, eccentricity, temperature and length directly on the hot tube without contact. In a nutshell, Lut 2.0 probes bring the performance and accuracy of ultrasound to the pipe hot rolling process. It delivers crucial information to operators: “Scientia potentia est” which means, knowledge is power. Visitors to the Tecnar booth at Tube Düsseldorf witnessed the power of Lut 2.0 and how it delivers valuable “knowledge” or information, to empower operators and plant managers.

Figure 1 – Tecnar’s Lut 2.0 at Tube Düsseldorf in April 2024.
There has been so much interest in this hot tube gauging system, that we’d like to share some highlights in this publication. Since seeing is believing, let’s look at real examples and data.
User-friendly interface (UI):
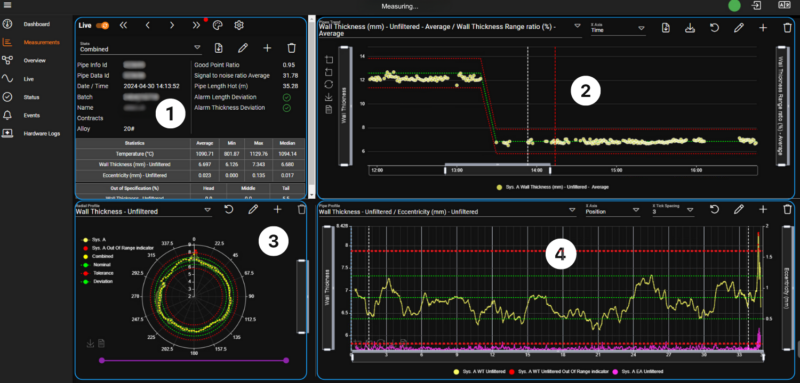
Lut 2.0 displays and stores data on each tube measured. This way, users can compare current pipe characteristics with past records. With just a couple of clicks, operators and managers can display the history of pipes produced to monitor batch fluctuations and drifts, if any, over time. This feature allows them to observe developing patterns, identify anomalies and make informed decisions based on accurate historical data. It’s very useful to track trends or deviations and to isolate their cause early, before they fall out of tolerance.

Figure 2 shows specific pipe identification and characteristics (zone 1); Historical data and batch trends (zone 2); pipe radial illustration (zone 3) and current tube longitudinal wall thickness and eccentricity profiles (zone 4).
Easy-to-interpret visuals deliver valuable information in the blink of an eye. An easy-to-navigate dashboard allows plant operators and managers to quickly access various powerful software features and the information most relevant to them for agile decision-making. Let’s take a look at some of them.
A picture is worth a thousand words:
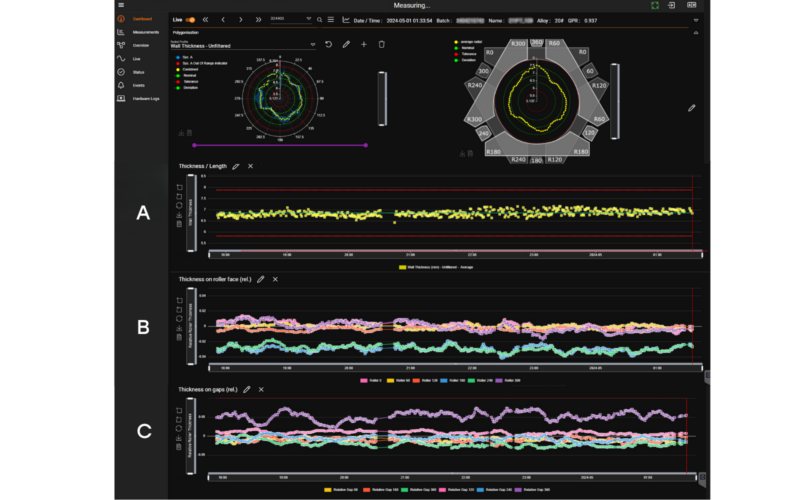
Lut 2.0 gives operators the complete picture. In the illustration below, Section A (Thickness/Length in yellow) shows the historical average wall thickness per tube (each dot represents a pipe). We can see that it is quite consistent from pipe to pipe and well within target throughout the batch. However, Section B (Thickness on roller face) shows that two roll positions have broken away from the pack: the blue line and the green line. These rollers and their relative position are shown in the top right radial illustration (rollers at position R-180 and R-240). We can clearly see that these rollers are applying more pressure on the tube, resulting in a thinner wall at that location. Moreover, this pressure forces some of the material to move in the opposite direction, to the gap between adjacent rollers, creating an overfill. In Section C (Thickness on gap), the purple line breaking away from the pack shows that the tube wall is thicker. This overfill and its relative position are clearly detailed in the top right radial illustration, at the gap 360 position.

Figure 3 – The thickness on roller face graph (Section B) shows that positions R-180 (in blue) and R-240 (in green), the tube wall is thinner relative to the other roller positions. The thickness on gaps graph (Section C) shows that at position 360 (in purple), the tube wall is thicker relative to the other positions.
Powerful real-time knowledge:
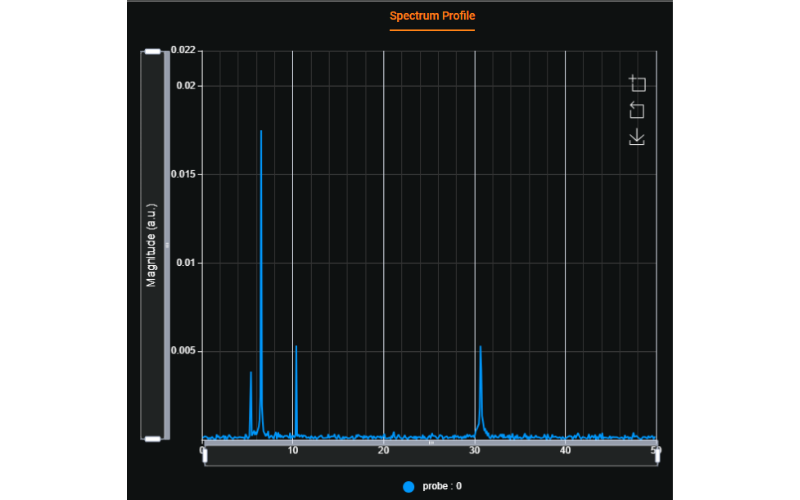
Quality information presented in a user-friendly format in real time is crucial in monitoring dynamic processes. Lut 2.0 displays and collects highly accurate data essential for the early detection of trends and potential deviations in wall thickness, eccentricity and polygonization before they become non-compliant. These may be caused by uneven billet heating, piercing tool wear or inaccurate roll-stand settings. Lut 2.0 identifies and tracks sources of deviations using a detailed automated analysis for each tube spectrum profile. Each peak in the tube spectrum profile relates to, or points to, a single cause of eccentricity. Lut 2.0 provides advanced notice to operators and managers in a comprehensive and intuitive user interface, enabling them to make informed decisions at the right time.

Figure 4 – An example of a specific tube spectrum profile. Each peak corresponds to a single cause of eccentricity.
A model to fit your specific application:
Tecnar designs various probes to accommodate different types of manufacturing processes with unmatched flexibility. Lut 2.0 is available in a single fixed-probe version or in a scanning model equipped with one to three probes, which can take high-precision, high-resolution measurements in scanning or in fixed mode. What’s more, they’re safe to use since there are absolutely no radioactive gamma rays.
By setting the bar higher, laser ultrasonic technology is becoming the standard for monitoring key hot tube and pipe characteristics such as true wall thickness, eccentricity, temperature and length without any contact.
I hope you enjoyed reading about laser ultrasonic technology. To learn more, please visit https://lut.tecnar.com and stay tuned to the Tecnar Steel page on LinkedIn!
(This article was originally published in ITATUBE Journal – July 2024)
